ATTENTION BREAD BAKERS!!!

Mama

Queen of Cornbread
Site Supporter
I have never mastered the art of bread baking. Sure, I can make biscuits, cornbread and quick breads but I'm talking about yeast breads. I bought America's Test Kitchen TV Show Cookbook for the first 10 seasons and it came with the dvds for all of the episodes. I really want to make the multi-grain bread. It was light and airy when they made it on tv but although my first 2 attempts have yielded wonderfully tasting bread, it was dense and did not brown well. I think that it will make wonderful french toast so it won't be going to waste but it is not even close to being what I was hoping for.

Here is what their bread looked like:

file.php


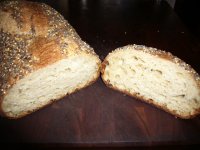
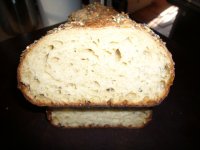
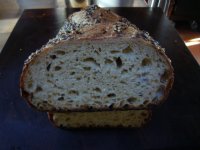
Here is what my bread looked like:

file.php


So, here is the recipe and the instructions along with the pics of MY bread for each step. I'm hoping someone can tell me where I went wrong.

1 1/4 cups (6 1/4 ounces) seven grain hot cereal (I used and they recommend Bob's Red Mill)
2 1/2 cups boiling water
3 cups (15-ounces) unbleached All-Purpose Flour, plus extra for the dough and work surface
1 1/2 cups (8 1/4 ounces) whole wheat flour (the DVD said to use 7 1/2 which is what I used for the second batch)
1/4 cup honey
4 tablespoons (1/2 stick) butter, melted and cooled slightly
1 envelope (2 1/4 teaspoons) of rapid rise yeast
1 tablespoon table salt
3/4 cup of unsalted pumpkin seeds or sunflower seeds (I used sunflower seeds)
1/2 Old Fashioned Rolled Oats or Quick Oats (I used Old Fashioned)

1) Place the cereal mix in the bowl of a standing mixer and pour the boiling water over it; let stand, stirring occasionally until the mixture cools to 100° and resembles thick porridge; about 1 hour.

I used Bob's Red Mill. The one they recommended.

file.php


2) Whisk the flours together in a medium bowl.

file.php


3) Once the grain mixture has cooled, add the honey, melted butter and yeast and stir to combine.

file.php


The yeast had not been opened and had in the fridge with an expiration date of May 2011. I got it out 1 hour before using.

4) Attach the bowl to a standing mixer fitted with a dough hook. With the mixer running on low speed, add the flours a half a cup at a time, and knead until the dough forms a ball, 1 1/2 to 2 minutes.

file.php


5) Cover the bowl with plastic wrap and let the dough rest 20 minutes.

file.php


6) Add the salt and knead on medium-low speed until the dough clears the sides of the bowl, 3 to 4 minutes (if it does not clear the sides, add 2 to 3 tablespoons of additional All-Purpose Flour and continue mixing); continue to knead the dough for 5 more minutes.

file.php


7) Add the seeds and knead for 15 more seconds.

file.php


8) Transfer the dough to floured work surface and knead by hand until the dough forms a smooth, taut ball.

9) Place the dough in a greased container with a 4-quart capacity; cover with plastic wrap and allow to rise until double in size, 45 to 60 minutes.

file.php


continued in the next post......
 

Mama

Queen of Cornbread
Site Supporter
10) Adjust an oven rack to the middle position and heat the oven to 375°. Spray two 8 1/2 x 5 1/2-inch loaf pans with vegetable oil spray.

11) Transfer the dough to a lightly floured work surface and pat into a 12 x 9-inch rectangle.

file.php


12) Cut the dough in half crosswise with a knife or bench scrapper.

file.php


13) With the short side facing you, starting at the farthest end, roll one dough piece into a log, keeping the roll taut by tucking it under itself as you go.

file.php


14) Seal the loaf by pinching the seam together with your thumb and forefinger.

file.php


15) Repeat with the remaining dough.

16) Spray the loaves lightly with water or vegetable oil spray.

file.php


17) Roll each loaf in the oats to coat evenly.

file.php


18) Place seam side down in the greased loaf pan. This was After it finished rising. It did double in size. I did use a 9 1/2-inch loaf pan instead of the 8 1/2 inch that the recipe called for.

file.php


19) Cover lightly with plastic wrap and let rise until almost double in size, 30 to 40 minutes. (The dough should barely spring back when poked with a knuckle)

file.php


20) Bake until the center of the loaves reaches 200° on an instant read thermometer, 35 to 40 minutes. Remove the loaves from the pans and cool completely on a wire rack before slicing, about 3 hours.

file.php


So, there you have it! I really like the taste of this recipe and would really like it to turn out light and fluffy like it was on tv. I would appreciate any and all advice.
 
Last edited:

SilverSage

Resident Crone
Mama, I have that same problem every time I try to make bread. Follow the recipe ............. everything looks good ............... heavy, dense loaf with good flavor, but lousy texture.

I can't offer any assistance, but I'll be watching for answers with you.
 

Mama

Queen of Cornbread
Site Supporter
Well, it's nice to know that I'm not alone. Thanks SS! I'm determined to figure this out...hopefully with a little help from my friends :flowers:
 

Guts

New member
I say bravo Mama I can't offer any advice. There's only about three breads that I make and none of them are wheat bread or use wheat flour. Although I do have some wheat flour in the house that I was going to try making a wheat pizza dough. I see you're using rapid rise yeast that something that I never played with. I picked some up by mistake one time and never bought it again. I think your bread looks great and I sure wouldn't hesitate to make a albacore tuna sandwich with it.
 

Mama

Queen of Cornbread
Site Supporter
It just occurred to me that I used salted butter. It's all I ever buy so I didn't even think about it. I have heard that salt will kill yeast but the bread did rise. Could it have made a difference?
 

Keltin

New member
Gold Site Supporter
I’ve been using the yeast that comes in a jar. I keep it in the fridge after opening. On this recipe, I’d suggest increasing the yeast by 1/4 tsp and use Bread Flour instead of All Purpose flour.

I made a loaf of bread the other day with All Purpose just to see what the difference is, and it was a lot denser than the bread that I get when I used Bread Flour. Not bad bread, just different from the other. Closer to the packaged white bread that you can get in the store; denser and not as “airy”. Bread flour has definitely made a difference in my experience.
 

MexicoKaren

Joyfully Retired
Super Site Supporter
Joe will have the final answer on this, but he is sitting on a beach somewhere in the Caribbean sipping rum (!). I know we have other genuine experts here, as well.

I have great faith in the America's Test Kitchen, and cannot imagine that they would steer you wrong, and you are such an excellent cook overall that this should be easy for you. I am not an expert bread baker, but I do bake all of our own bread. The recipe you used is similar to the honey oat bread I make, and it always comes out pretty light and fluffy. I can only think of a couple of things I do differently: first of all, I always use instant yeast. The yeast I use is made here in Mexico, and is the number one selling item on the King Arthur Flour's website. Here is a link: http://www.kingarthurflour.com/shop/items/saf-gold-instant-yeast-16-oz

With instant yeast, you mix it in with your dry ingredients - you don't proof it first. Works great for me. The other thing is that I don't knead it quite that long. As I said, I trust ATK, but that seems like alot of kneading. I mix the dry ingredients with a whisk, then start the mixer with the dough hook, and add the wet ingredients. At this point, I may need to add more flour, until the dough ball cleans the side of the bowl. I usually let the mixer knead it for about 5 minutes, then take it out and knead it by hand for a few minutes, just to see if it feels smooth and stretchy. If I'm feeling energetic, I'll knead it myself, for 5-7 minutes. I like the way the dough transforms while I'm kneading it. This morning, I made two batches of cinnamon rolls, then a batch of bread. My KA was getting pretty hot by then, so I decided to hand knead the bread. It did have a finer, better texture than I usually get with the mixer, in fact.

At that point, I do just what you did - put it in a greased bowl (butter or olive oil), let it rise until double, form it into loaves (I don't use the "spiral" method, though - I just form the loaves. I usually make a kind of modified baguette and don't often use bread pans), let it rise again.

Having said all of that, I have never baked better bread than I bake here in Mexico - I think being at sea level, plus the year-round humidity, has something to do with that...so I may just get lucky!

Your bread looks very very good, though, and I'll bet it tastes good, too!
 

Mama

Queen of Cornbread
Site Supporter
Thanks Keltin and Karen for your input. I may need to do some experimenting.

I've been racking my brain trying to figure this out. I have a great deal of respect for ATK too. With that said, I was wondering if maybe I was over-kneading it too. I may watch the DVD again tomorrow. It did give different measurements on the wheat flour (8 1/4 ounces in the written recipe and 7 1/2 ounces on the DVD) so maybe it gives different kneading times on the DVD too. I'm out of the rapid rise yeast but I do have some instant yeast in the freezer so I may use that next time.

Karen, does your honey oat bread use AP flour or bread flour?
 

MexicoKaren

Joyfully Retired
Super Site Supporter
Mama said:
Karen, does your honey oat bread use AP flour or bread flour?

Wish I could tell you! The wheat flour available in the stores here comes in one type only: harina de trigo. Remember that I live in a country where the tortilla is the staff of life, not bread. I have experimented with several different brands, and buy based on that experience. I have found some brands that behave more like bread flour, and buy those when I can find them. I think that most of what I use is closer to AP, though.
 

MexicoKaren

Joyfully Retired
Super Site Supporter
I should also add that I can buy whole wheat flour, i.e., "harina integral". It is not as finely milled as the whole wheat flour in the US, and it is actually very good.
 

vyapti

New member
I think, over the last year, I've gone from a lousy baker to a somewhat decent baker. And I think the biggest point of advice on bread is to be patient. If you think you've waited long enough, wait some more, especially if your kitchen is at all cool.

I've always over-estimated the oven rise usually try to get the bread in the oven sooner than I should. And, from judging from experience, it's better to have over proofed bread than under proofed (Dense) bread. For bread loaves, I usually wait until the dough has crested the pan, no matter how long the recipe says it should take.
 

Mama

Queen of Cornbread
Site Supporter
There is a write-up just before the recipe that says, "Why this recipe works":
Although multigrain bread often has great flavor, the quantity of ingredients weighs it down so much that the loaf becomes as dense and as heavy as a brick. On the other end of the spectrum are loaves with a nice light sandwich-style texture but so little grain that they're hard to distinguish from plain old white bread. We wanted a multigrain bread with both great flavor and balanced texture.

Our first challenge was to develop more gluten (a protein made when flour and water are mixed and that gives baked goods structure) in the dough, as early tests showed that the whole grains were impeding its development. Because the protein content of any flour is an indicator of how much gluten it will produce, we thought first to switch out All-purpose flour for higher protein bread flour, but this move only made the bread chewier, not less dense. The solution was two-fold: long kneading preceded by an autolyse, a resting period just after the initial mixing of water and flour that gives flour time to hydrate. This combination also made the dough less tacky and therefore easier to work with. The result was a loaf that baked up light yet chewy, without being tough. To incorporate grains into the bread, we hit upon a convenient one-stop-shopping alternative: packaged seven-grain hot cereal. To soften the grains, we made a thick porridge with the cereal before adding it to the dough. A final step of rolling the shaped loaves in oats yielded a finished' professional look.

Okay, so after rereading this, I did a little more research on the word "autolyse" and here is what Wiki has to say:

Autolyse is an optional dough process, it refers to a particular period of rest after the initial mixing of flour and water, a rest period that occurs sequentially before the addition of yeast and other ingredients. This rest period allows for better absorption of water and helps the gluten and starches to align. Breads made with autolysed dough are easier to form into shapes and have more volume and improved structure.

Now, according to the recipe, I'm supposed to add the honey, butter and yeast before I let it rest but according to the definition of autolyse, I'm supposed to let it rest and then add the yeast. So now, I'm really confused :huh:
 

Adillo303

*****
Gold Site Supporter
First off, I am no JoeV. I have baked a bunch of bread though. I do not think salted butter is necessarily the issue. If the recipe calls for some salt (usually does) you might back off a little.

Instant yeast and regular yeast are the same little living things. As they are dried to make powdered yeast, the cells on the outside die to form a protective layer around the living cells. In rapid rise yeast, they dry with a different process, which leaves more living cells inside. Rapid rise has about 60%% more living cells.

Rising bread is about Waking up the yeast cells, which go to work eating protein and making carbon dioxide, such rises the bread. They also reproduce. I agree with vyapti that time and patience had a lot to do with it. Needing time it important too. You can add some vital wheat gluten to the batch. It gives the yeast more to do.

Mostly remember that it is the action of living yeast cells doing the work and they have no clocks. Be patient.

Hope this helps.
 

ChowderMan

Pizza Chef
Super Site Supporter
>>what went wrong . . .

first, whole grains breads are notorious tricky to make light&fluffy. I see you cut back already on the whole wheat; I typically go for 1/3 whole wheat - just to not be so dense.

as indicated, the autolyse period can help - this 'period of time' is different from rising time(s) - do let it autolyse for 20 minutes or so. I put the yeast in pre-autolyse, it really should not make much difference.

salted vs unsalted butter is a moot point, you can use either. the salt kills yeast thing is actually true, but under very specific circumstances - like dumping the yeast & salt into one pile in the bowl and not distributing/mixing them in before adding liquids.....

I see the recipe is given in cups and by weight. hopefully you used the weight measures - much more accurate and much easier to 'adjust' if need be. Adjust? well, if you cast about the I-Net you'll find raging discussions about how much a cup of flour weighs.... not only due to whether it's sifted, packed, scooped&leveled, but various flours from various mills do react differently.

one "general thing" about light&fluffy breads - they tend to the higher hydration levels - ie the % of water to flour ratio. now,,, this is trickier when dealing with mixed flours and mixed grains. I would be tempted, given all the dry ingredients, to adjust the water up a bit - 2.5 c=595 grams = 21 ounces; I go with 22 ounces next try. (yes, I weigh my water . . . )

although the rise looks reasonable, it does not appear you got a lot of "oven spring" - that's the bit where the loaves puff up when you put them in the oven. this is another mini-clue that the dough may be a bit too dry. and, the extra water will foster more sugars to move to the surface which is what does the browning....

push come to shove, you can add 'vital wheat gluten' to assist - about a tablespoon per loaf.

couple other tricks to try - if you have a baking / pizza stone, preheat the oven & stone to max temp, place the loaf pans on the stone, turn back the bake temp when the loaf goes in.
 

MexicoKaren

Joyfully Retired
Super Site Supporter
I KNEW there were some other experts here! That's alot of good advice. I am not nearly so precise with my ingredients, and tend to add more flour, water, oil, etc. to the dough until it "feels right". Yesterday, I made our usual Italian bread recipe and the dough felt dry, so I kneaded in a little more oil by just spilling a bit onto my hands. The bread turned out perfect. But I really do believe that the tropical environment is more forgiving. Even though it is not very hot here right now (mid 70s during the day, mid 50s at night), there is something about tropical air, maybe the persistent humidity, that seems to favor bread baking.
 

Mama

Queen of Cornbread
Site Supporter
Wow....THANKS Y'ALL.....this is wonderful! I'm learning sooooooo much!

I did watch the dvd one more time this morning and learned a little more too. First, the written recipe calls for 2 1/4 teaspoons of yeast but the video called for 2 1/2 teaspoons. So, all of you folks who suggested that I increase the yeast, you were soooo right.

The written recipe also said the "knuckle" test consisted of pressing a knuckle into the risen loaf and if it "barely springs back" then it has finished rising but in the video it says that when you poke it with your knuckle it springs back and doesn't leave an indentation so y'all were right in your observations that I may not have been letting it rise long enough.

I have been weighing my dry ingredients but not the wet.

So, on the next batch (probably monday), I will be using instant yeast and increasing the amount to 2 1/2 teaspoons.

You're right ChowderMan, I didn't get much rise at all in the oven and it didn't brown well at all so I will weigh ALL of my ingredients and increase the water to 22 ounces. I wonder how much 1/4 cup of honey weighs?

The last rise I will let go a lot longer.

I do have a pizza stone so I'll be using that next time too.

I'll post the results.

Thank you all so very much for your help. I really like the flavor of this recipe so I don't want to just abandon it...besides, it's been a challenge and I love a good challenge.

:thankyou:
 

Mama

Queen of Cornbread
Site Supporter
I was trying to give karma to all of you for your wonderful help and it seems I was a little too quick on the keyboard and I inadvertently may have taken away from some peoples reputations. I emailed Doc hoping that he can fix it. I want to apologize to anyone that I may have taken points away from. I feel so bad. I noticed it with Keltin so I know that I did it at least once. I'M SORRY!!!!! If I took points away from anyone else, please let me know so that I can make it up to you in future karma.
 

Doc

Administrator
Staff member
Gold Site Supporter
Great thread Mama. I tweeted about it on twitter. Maybe we'll get some more bread bakers. :D
I bumped all the reps of folks in here just in case you took away from them accidentally.
 

Doc

Administrator
Staff member
Gold Site Supporter
Thanks Doc! I didn't even know we were on twitter! Kewl!
I'm new on there. Just a few 'tweets' so far.
I found a tool that is used to grade sites for their outside links and we here on Net Cooking Talk did very poorly in the social network arena. I'm trying to fix that and maybe that is the key to getting the word out and attracting new members.
 

JoeV

Dough Boy
Site Supporter
Well, we managed to get back home from Punta Cana tonight, even though I was kicking and screaming, having a hissy-fit because I had to leave. I could easily get used to that great weather, but it will turn to ugly heat and humidity real soon, as the peak tourist season will be over March 15th when the heat rises and the prices come down.

FWIW, I was in heaven with some wonderful breads made fresh daily. The food overall was mediocre, at best, but the breads and rolls were fantastic at every meal. Plus, their butter is very sweet which added to my enjoyment.

P1030433.jpg


P1030432.jpg


As far as Mama's bread dilemma, the answers are already posted here by our great bread bakers. Essentially, here are my thoughts:

1. I NEVER use all purpose flour for yeast breads or rolls. AP is for sweet breads and pastas, but with its low protein content, there is insufficient gluten to trap the gas given off by the yeast. The recipe is plain wrong to specify AP flour, so go out and buy some bread flour, regardless of brand. I also make my grain breads using 1/3 coarse grain flour and 2/3 bread flour. Most of my bread recipes also use 32-33 oz total flour weight, with at least 56-60% hydration (total liquid weight) for sandwich type breads.

2. Instant yeast or Rapid Rise yeast (both the same) is mixed with all of the dry ingredients. You all have seen my breads, and I mix all my wet ingredients together and put them in the mixer. I then blend all the dry ingredients together so they are well mixed, and dump them all on top of the liquid...ALL of the dry ingredients. I attach the dough hook and mix the dough for 6-7 minutes on 2-3 on my KitchenAid. This develops the gluten extremely well, and I just turn it out and knead the dough just enough to bring it into a smooth ball before putting it in the grease bowl til it doubles in size.

3.After the dough doubles in size, I divide it in half and shape it into rectangles like described above, but using only my finger tips to do so. I no longer "punch" down the dough, but just gently shape it the way I want it to look. After shaping the loaf, I put them in greased pans with the seam side down and cover with plastic wrap. I let the bread rise to about 1-1/2 times its size (usually 45 minutes in a warm kitchen), slash the tops, then put it in the oven. I let the heat from the oven finish the rise, and it never disappoints me. It also guarantees the the loaf will not "fall" from rising too high for too long.

On that note, I need to fold the clothes in the dryer and hit the sack. It was a long travel day, and I'm looking forward to getting back into my kitchen. Keep plugging way, Mama. It gets easier as time goes on, just like all repetitious activities.
 

Doc

Administrator
Staff member
Gold Site Supporter
Welcome back Joe. Good info. I'm glad you added your two cents to this thread. :thumb: :tiphat:
 

UnConundrum

New member
Gold Site Supporter
Mama, here's my observations.... hope it helps.

First, the salt. Unless I missed something, there's about 30 oz of flour (excluding the seeds and rolled oats). Depending on the type of salt, a tablespoon is about an ounce. The rule of thumb for breads is that the salt should weigh about 2% of the weight of the flour. So, according to the rule of thumb, you'd want .6 oz and you added a full ounce PLUS the salt in the butter. As you pointed out, the salt retards the action of the yeast and could contribute to your problems.

Your liquids are about 66% depending on if you include the honey in the calculation. For mixing by machine, I'd say you're about right there. I often go up to 80% hydration, but that's when I mix the dough by hand. With a machine, you'd end up with a batter.

The brand of flour you used is important too. Generally speaking, as JoeV pointed out, all purpose flour has less gluten and is more difficult to use. On the other hand, I always use King Arthur all purpose and have terrific results. Their flour does have a higher protein content. For starting out, try a bread flour as JoeV suggested.

You're final rise is probably too short. One missing piece of info is the temperature. Optimum temp is around 74 - 75 F.

An autolyse is usually a flavor enhancing technique, not done to increase the rise. The idea is to wake up the enzymes in the flour before you add all the other ingredients and give them a head start. Technically, they can start breaking down some of the starch into sugars that can feed the yeast when added, but flavor is the goal.

You have a lot going on in this bread for a first time bake. My current favorite bread is:

50% white flour
50% whole wheat flour
80% water (67% if mixing by machine)
2% salt
5% honey
.03% yeast.

By hand:

Put the water, honey and salt into your bowl and mix to dissolve the salt and honey.

Mix the flours and yeast in another bowl. Add the flour mixture to the water and mix by hand till all the flour is incorporated.

Let rest 20 minutes.

Remove to a well floured workspace and fold. Return to covered container.

Rest 20 minutes and repeat folding.
Rest 20 minutes again and repeat folding.
Rest 2.5 hours.
Preshape loaves and let rest 10 - 15 minutes
Shape loaves and allow to rise till doubled, about an hour.

All rising at about 74F.
All ingredients should be about 70 - 75F. Adjust average by raising water temp.

No autolyse is needed here as the 2.5 hour rise gives the enzymes plenty of time. On the other hand, I usually use home ground whole wheat. In that case, immediately after the grinding is done, I add 100% of the whole wheat, a matching amount of water (by weight) and 100% of the recipe's salt to a bowl, mix, and allow to sit overnight. In the morning I add the remaining water and honey, mix, and then add the white flour and yeast. The salt can be added due to the overnight length of the autolyse. Here, the autolyse is especially important as fresh ground whole wheat flour has an acid in it that will adversely affect the flavor of the bread. Overnight, the enzymes go to town on the acid making a wonderful bread.

I'd suggest you master a simple bread like this before you start adding fats and other grains.
 

UnConundrum

New member
Gold Site Supporter
Please excuse the camera... but here's some shots of the bread I made Saturday using the recipe above.
 

Attachments

  • P1050871.JPG
    P1050871.JPG
    146.1 KB · Views: 172
  • P1050872.JPG
    P1050872.JPG
    145.5 KB · Views: 177
  • P1050874.JPG
    P1050874.JPG
    121.8 KB · Views: 174

Mama

Queen of Cornbread
Site Supporter
Thank you all for your wonderful responses. I've thought about all of this wonderful advise and did some more research and I'm going to make some adjustments. For anyone who hasn't seen the episode of ATK, here is a link that I found. This particular bread begins around the 14 minute mark. The whole video is wonderful and and a great learning tool. Unfortunately, I've not been able to fast forward to the multigrain bread but the whole video is good if you have 22 minutes to watch it.

http://picasaweb.google.com/burn1cesharpe/ATKRollsAndLoaves#5454222156213267490

I'll let y'all know how things turn out and what I did differently.
 

Mama

Queen of Cornbread
Site Supporter
Okay...with my new found confidence (and a little vital wheat gluten :yum:) I'm ready to tackle this recipe again. The look and feel of this dough was very similar to the dough from my first attempt at the honey whole wheat bread that I wasn't happy with I'm going to make some of the adjustments that I made to wheat bread. This recipe makes 2 loaves, I'm going to use 2 packages of Rapid rise yeast instead of the one that the recipe calls for and I'm going to add 2 Tablespoons of VWG. Otherwise, I'm going to keep everything else the same. Wish me luck! I'll post pics when it's done.
 

Keltin

New member
Gold Site Supporter
You can do it!!! :clap:

Can't wait to see how this turns out. They say baking is more science thatn art, and I whole heartedly agree. It's amazing how just a small change in baking makes a huge difference, but is rarely noticeable in regular cooking. :doh:

You got this Mama!!
 
Top